
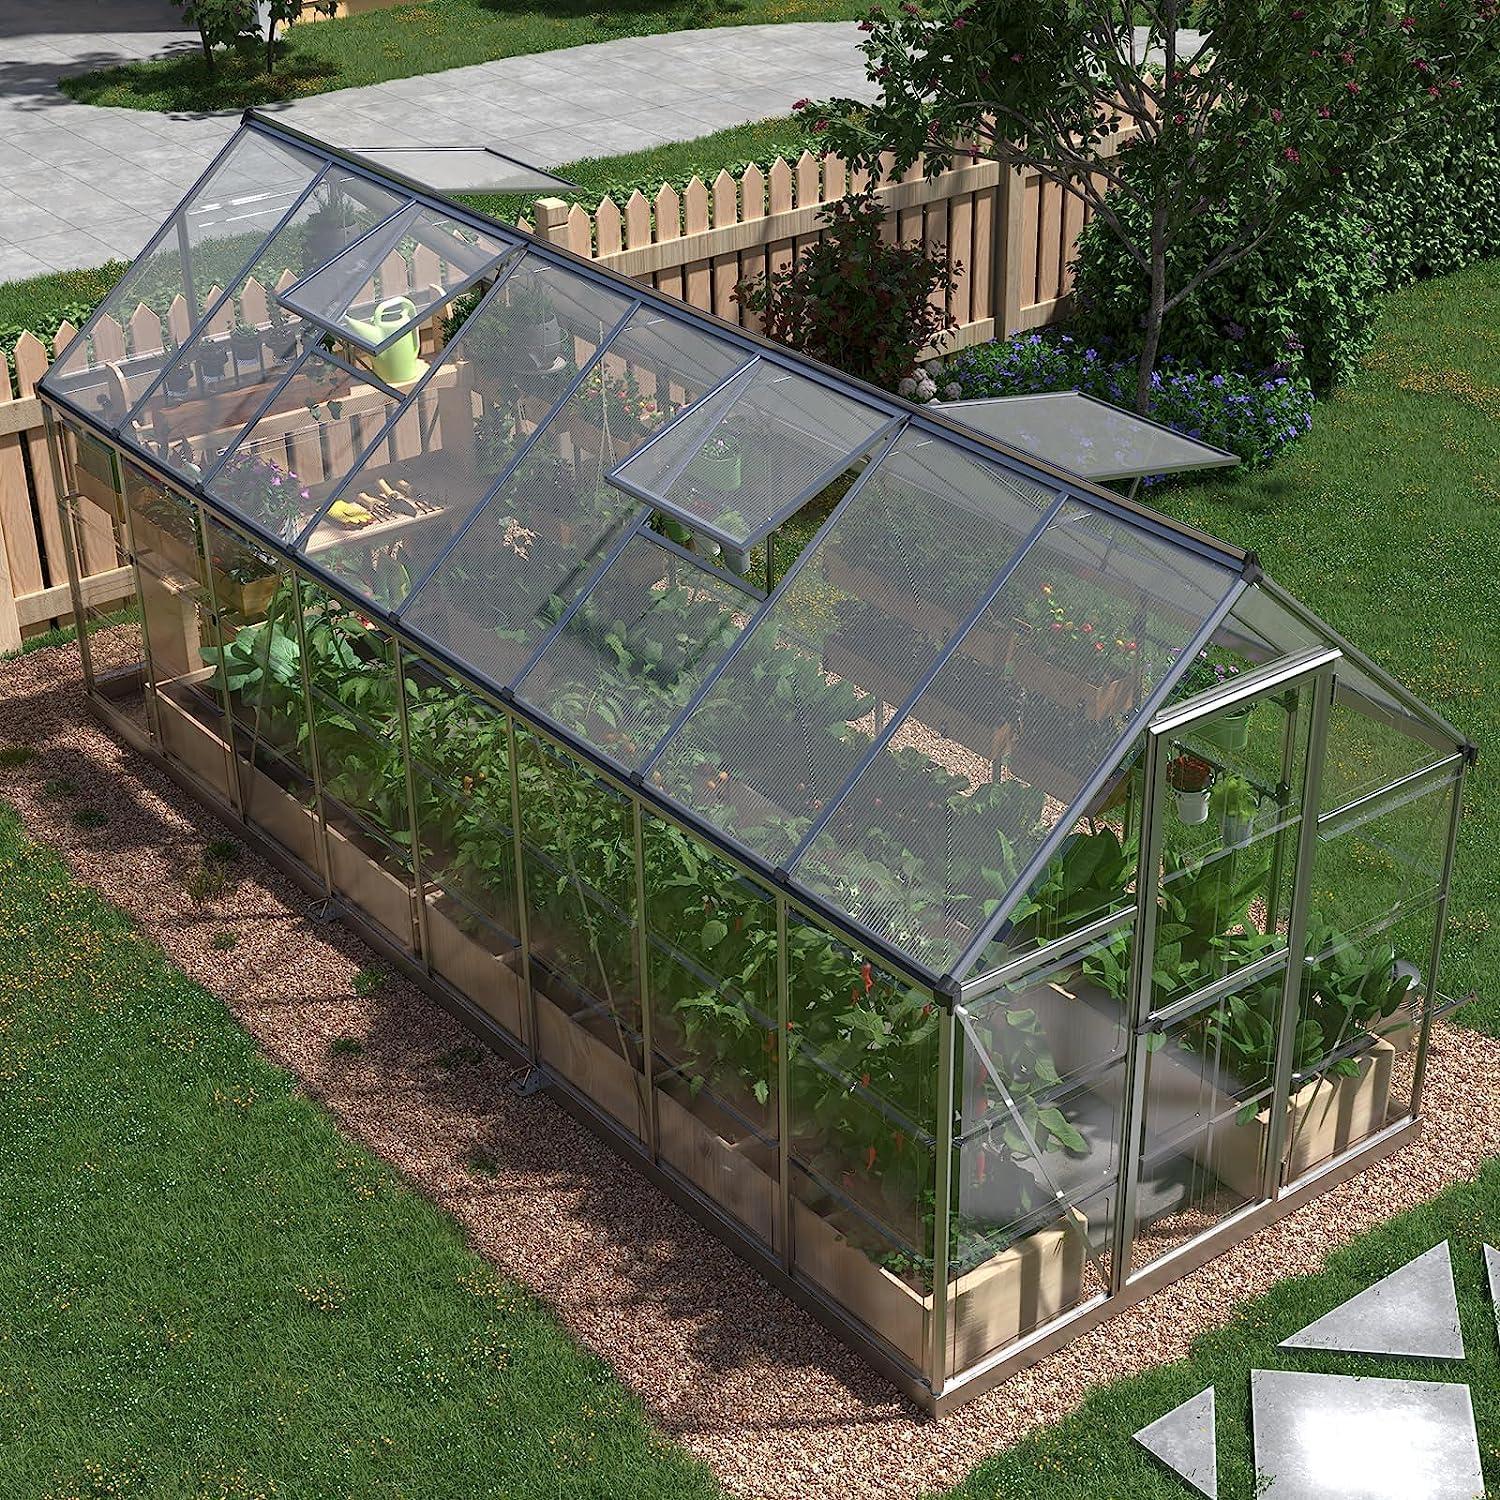
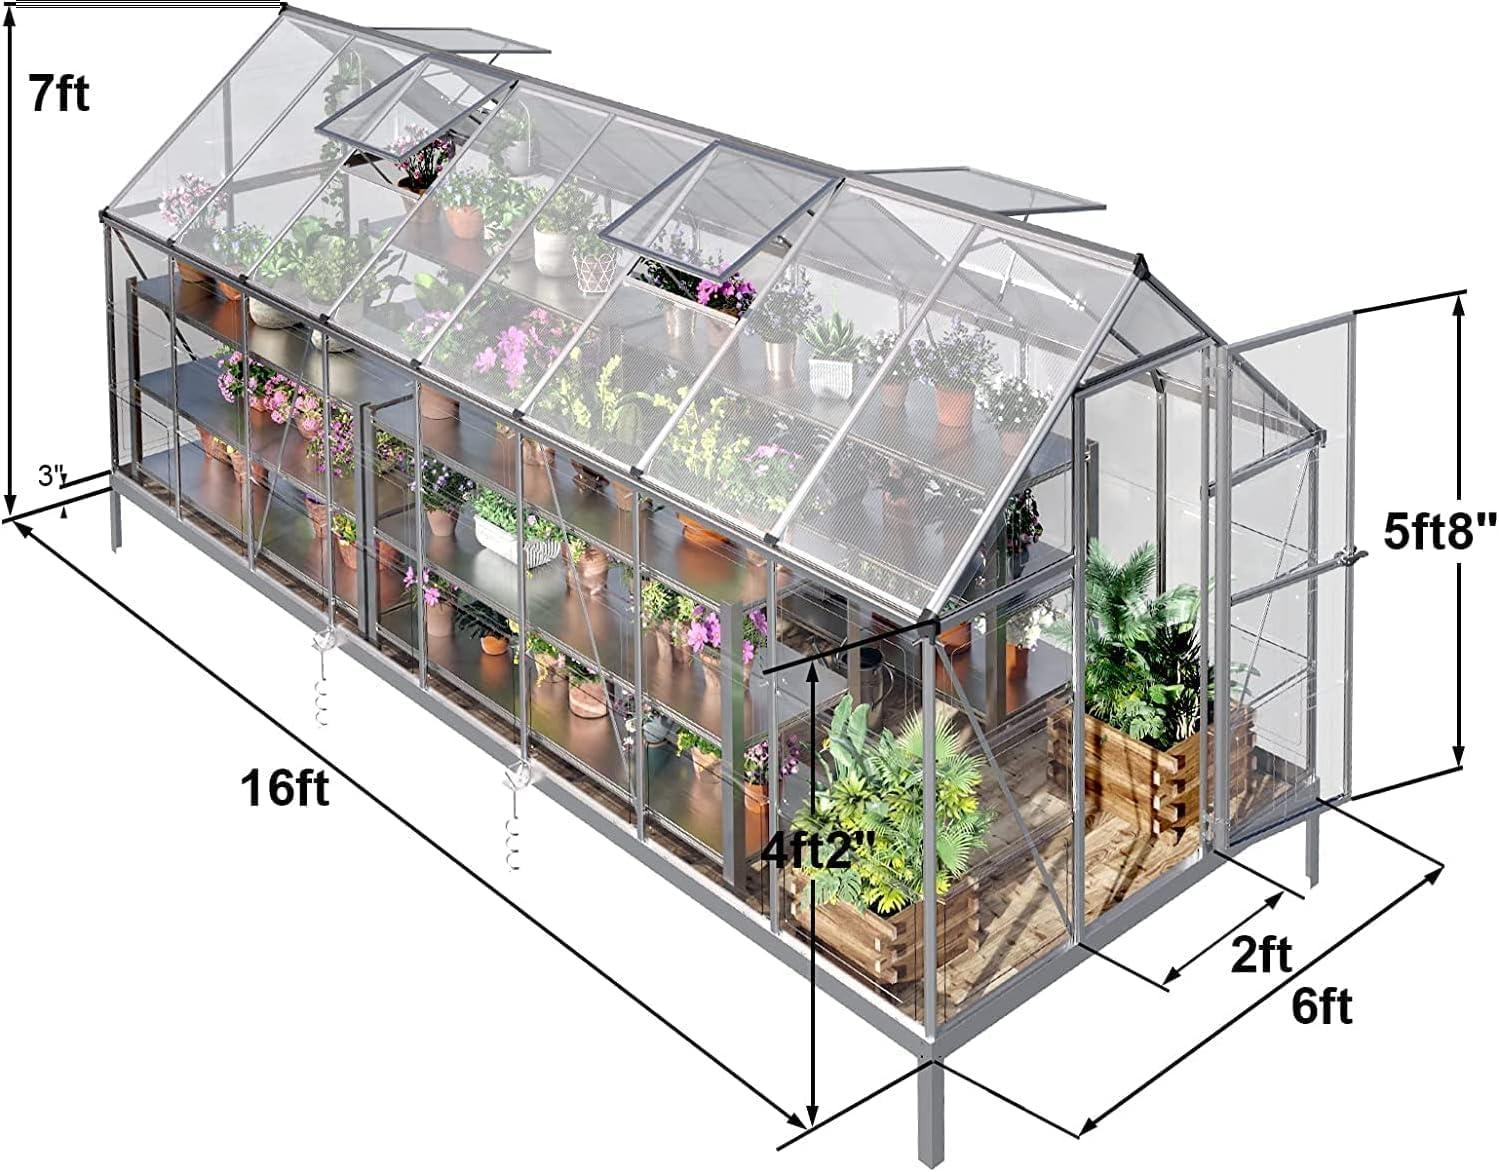
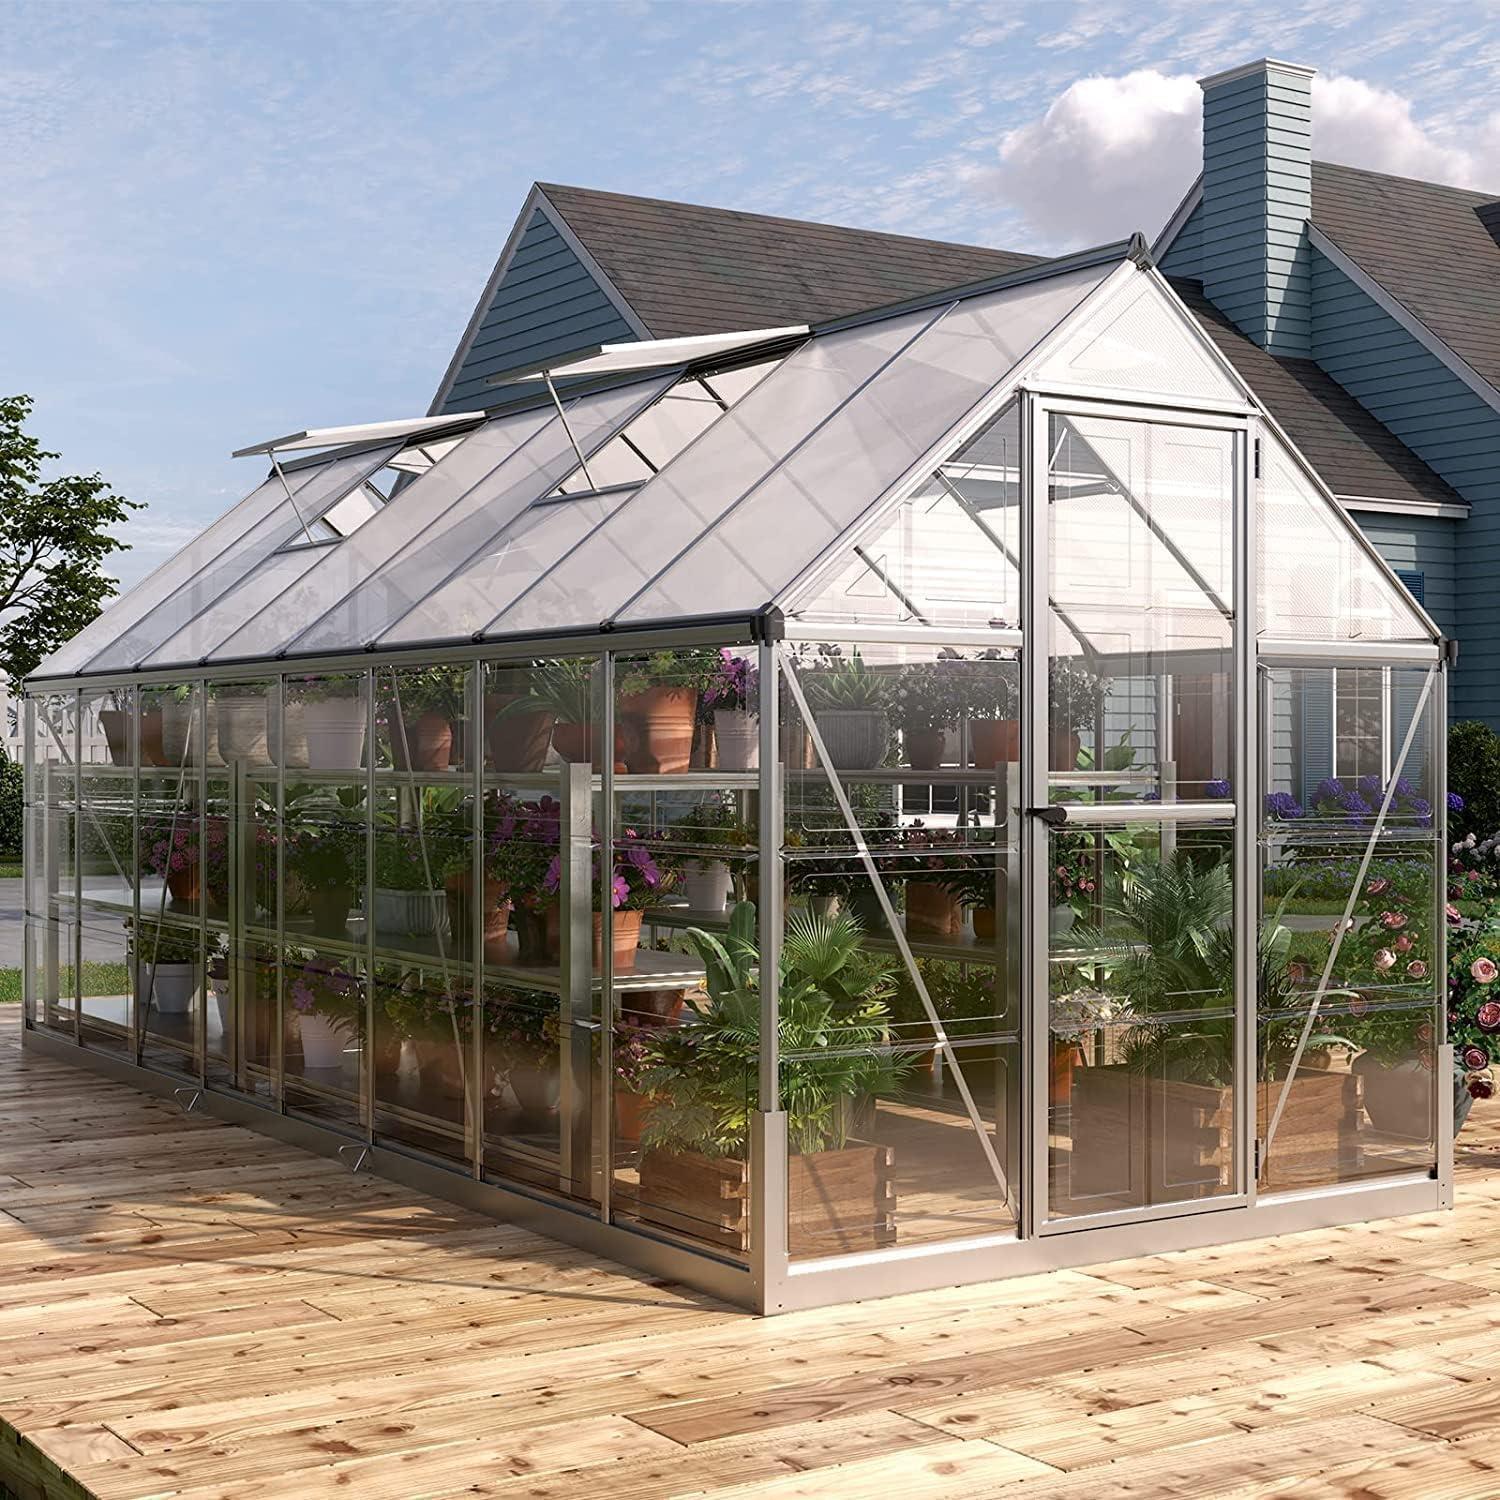
When we first unboxed the 6×16 FT Hybrid Polycarbonate Greenhouse with Hinged Door and 4 Vents, Large Lockable Aluminum Walk-in Greenhouse Sunroom for Outdoor garden, Backyard, Silver, it felt like we were opening the door to a small, year-round sunroom for our plants.At 6 by 16 feet the structure promises plenty of growing space, and the hybrid polycarbonate panels paired with an aluminum frame give it a lightweight, modern look that pours in light without feeling fragile. Over the course of assembly and the first few weeks of use in our backyard, this greenhouse proved to be as much about practical horticulture as it was about creating a sheltered, luminous nook for seed starting, overwintering, and experimenting with more tender varieties.
Before we get any further, a practical note from our hands-on experience: always wear appropriate safety gear when assembling this greenhouse. The frame and panels include some sharp edges and heavy components, and we found that gloves, eye protection, and a second pair of hands made the process far smoother. It’s important to ensure the greenhouse is properly anchored and well ventilated to prevent wind damage and heat buildup.
We also followed local building codes and kept pets and children away during assembly and while the structure was in use. These precautions kept the project safe and stress-free for our household.In this review we’ll walk you through how the greenhouse performed for us-covering assembly, sturdiness, ventilation (those four vents), the lockable hinged door, every-day usability, and whether the hybrid polycarbonate lived up to its promise of light diffusion and insulation.
We’ll share what surprised us, what frustrated us, and who we think this 6×16 model will suit best. If you’re considering a sizable walk-in greenhouse to elevate your backyard gardening, read on-our hands-on findings might help you decide if this is the right fit for your garden.
Overview of Our Experience With the Silver Polycarbonate Garden Greenhouse
We were pleasantly surprised by how spacious and functional this walk-in greenhouse feels once it’s up – the hinged door and multiple vents make daily access and airflow effortless, and the lockable frame gives us peace of mind when we leave tools inside. During assembly we took the safety guidance seriously: we wore gloves and eye protection, handled panels carefully to avoid sharp edges, and teamed up to manage the heavier components. Anchoring the structure securely and planning for cross-ventilation were key steps that made the difference between a flimsy setup and a stable backyard sunroom; we also kept pets and children well away while we worked to avoid any accidents.
- Assembly tip: Two people make the process smoother and safer.
- Ventilation: Four vents prevented overheating on sunny afternoons.
- Safety reminder: Follow local building codes and secure the greenhouse against wind.
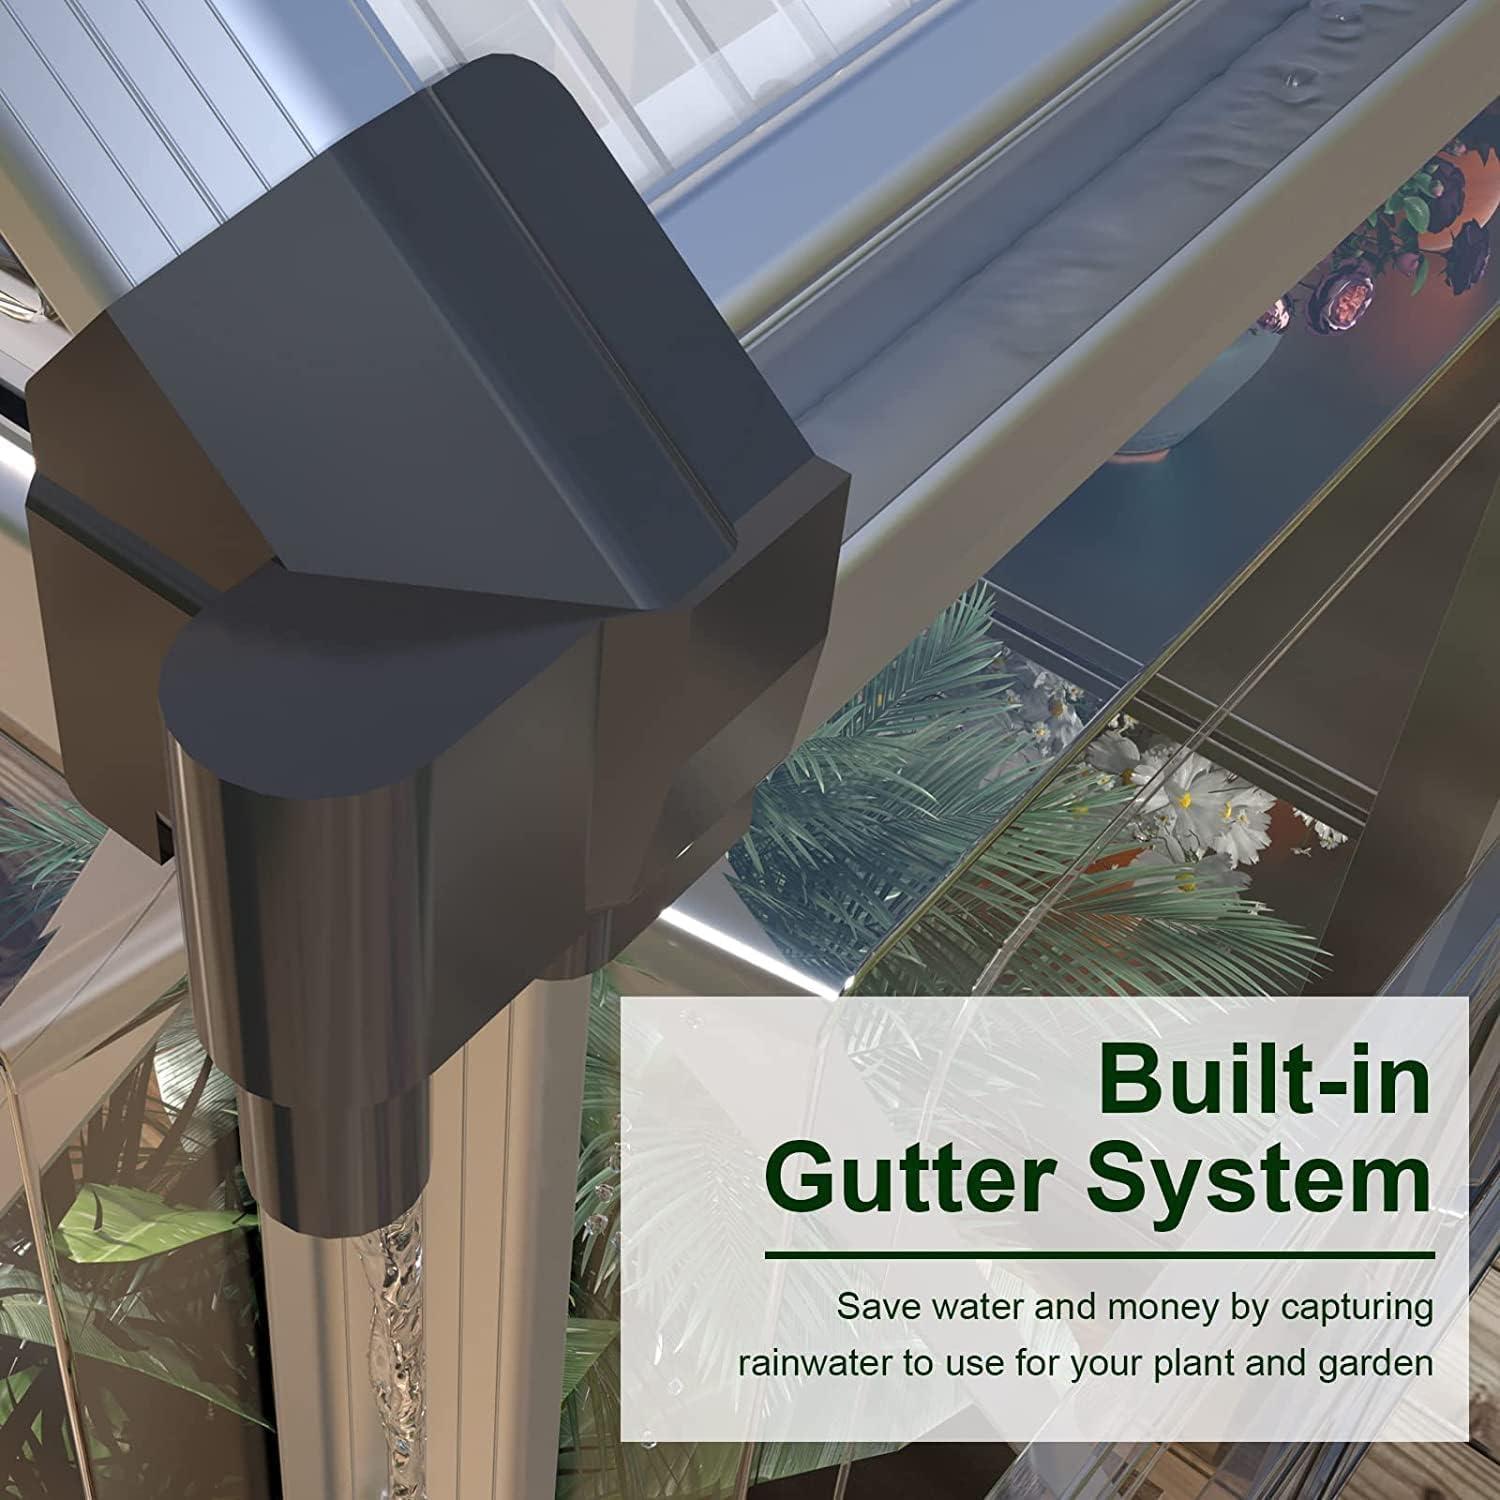
In daily use the combination of aluminum framing and polycarbonate panels balances durability with light diffusion, creating a protected microclimate for seedlings and potted plants. We recommend anchoring it to a solid base and keeping vents clear to avoid moisture buildup – following local regulations for outdoor structures really matters for long-term reliability.below is a quick snapshot of what stood out to us during setup and early seasons:
| Feature | Our Take |
|---|---|
| Size | Roomy for shelving and a workbench |
| Door | Hinged and lockable – secure |
| Vents | Four vents keep temps stable |
| Safety | Wear gear; watch sharp edges |
See current pricing and details on Amazon
What We Noticed About the Hinged Door Polycarbonate Panels Ventilation and Lockable Aluminum Frame
We noticed the hinged door and twin-wall polycarbonate panels make access and light management surprisingly user-friendly – the panels diffuse harsh sun while keeping humidity steady for seedlings. The four vents work together with the hinged entry to create cross-ventilation that reduces overheating on warm afternoons, and the lockable aluminum frame gives the whole structure a solid, secure feel when we step inside to prune or water. During assembly we took a cautious approach and followed safety best practices:
- Wear appropriate safety gear to protect against cuts and impacts.
- Be mindful of sharp edges and heavy components when lifting and aligning parts.
- Keep the area clear – pets and children away until the structure is complete and stable.
All of this made setup calmer and the finished enclosure more reliable for everyday gardening tasks.
Functionally,the ventilation setup plus the sturdy frame means we rarely worry about trapped heat or security; once the unit is properly anchored and ventilated it feels robust enough for regular backyard use. We also kept local rules in mind and took time to verify placement - it’s important to follow all local building codes and regulations for outdoor structures so there are no surprises. For a quick glance at the core features we paid attention to, here’s a simple overview:
| Feature | What We Noticed |
|---|---|
| Vent Count | Four vents = steady airflow |
| Door | Hinged for easy entry |
| Frame | Aluminum, lockable |
| Panels | Polycarbonate, light-diffusing |
- anchor firmly to prevent wind damage.
- Check seals around vents and door to maintain climate control.
Ready to improve your growing space? Shop it on Amazon
Detailed Insights and Our Practical Recommendations for Assembly Placement weatherproofing and Planting
When we choose the placement and begin assembly, safety and site selection are inseparable. We always wear appropriate safety gear and keep pets and children well away during assembly and while the structure is in use; being aware of sharp edges and heavy components helps us avoid common mishaps. For placement, pick a level, well-drained spot with good sun exposure and room for the hinged door to swing freely – and remember to anchor the greenhouse properly so wind and storms don’t turn it into a hazard. We also follow all local building codes and regulations for outdoor structures and make sure the unit is adequately ventilated from the start; the four vents are useful, but positioning them to create cross-flow ventilation makes a measurable difference in temperature control and plant health. Our quick placement checklist:
- Level footing: prevents frame stress and panel gaps.
- Anchor points: bolted to concrete or heavy-duty ground anchors.
- Clearance: door swing and maintenance access.
- safety: PPE, watch for sharp edges and heavy parts.
For weatherproofing and planting, we caulk seams where polycarbonate panels meet the frame and add splash guards at the base to divert rain – ensuring the greenhouse stays dry and the aluminum frame resists corrosion. We orient vents and the hinged door to maximize airflow, and we leave space for raised beds or movable benches so we can rotate crops and control soil moisture. Simple weatherproofing items we rely on are silicone sealant, UV-stable tape for seams, and heavy-duty anchors; combined with proper ventilation these measures reduce overheating and minimize storm damage. Below is our short, practical checklist for a planting-ready setup:
| Action | Reason |
|---|---|
| Seal panel seams | Keeps moisture out and extends life |
| Install anchors | Prevents shifting in strong winds |
| Plan bench layout | Optimizes airflow and access |
See current price and details on Amazon
Pros & Cons
Pros & Cons
We like to weigh the bright spots and the trade-offs before committing to a big structure like this. Below are the highlights and caveats we noticed while testing and imagining life in our 6×16 hybrid greenhouse.
What we appreciate
- Generous footprint: At 6×16 feet we have room to bench, pot, and roam – it feels more like a sunroom than a shed.
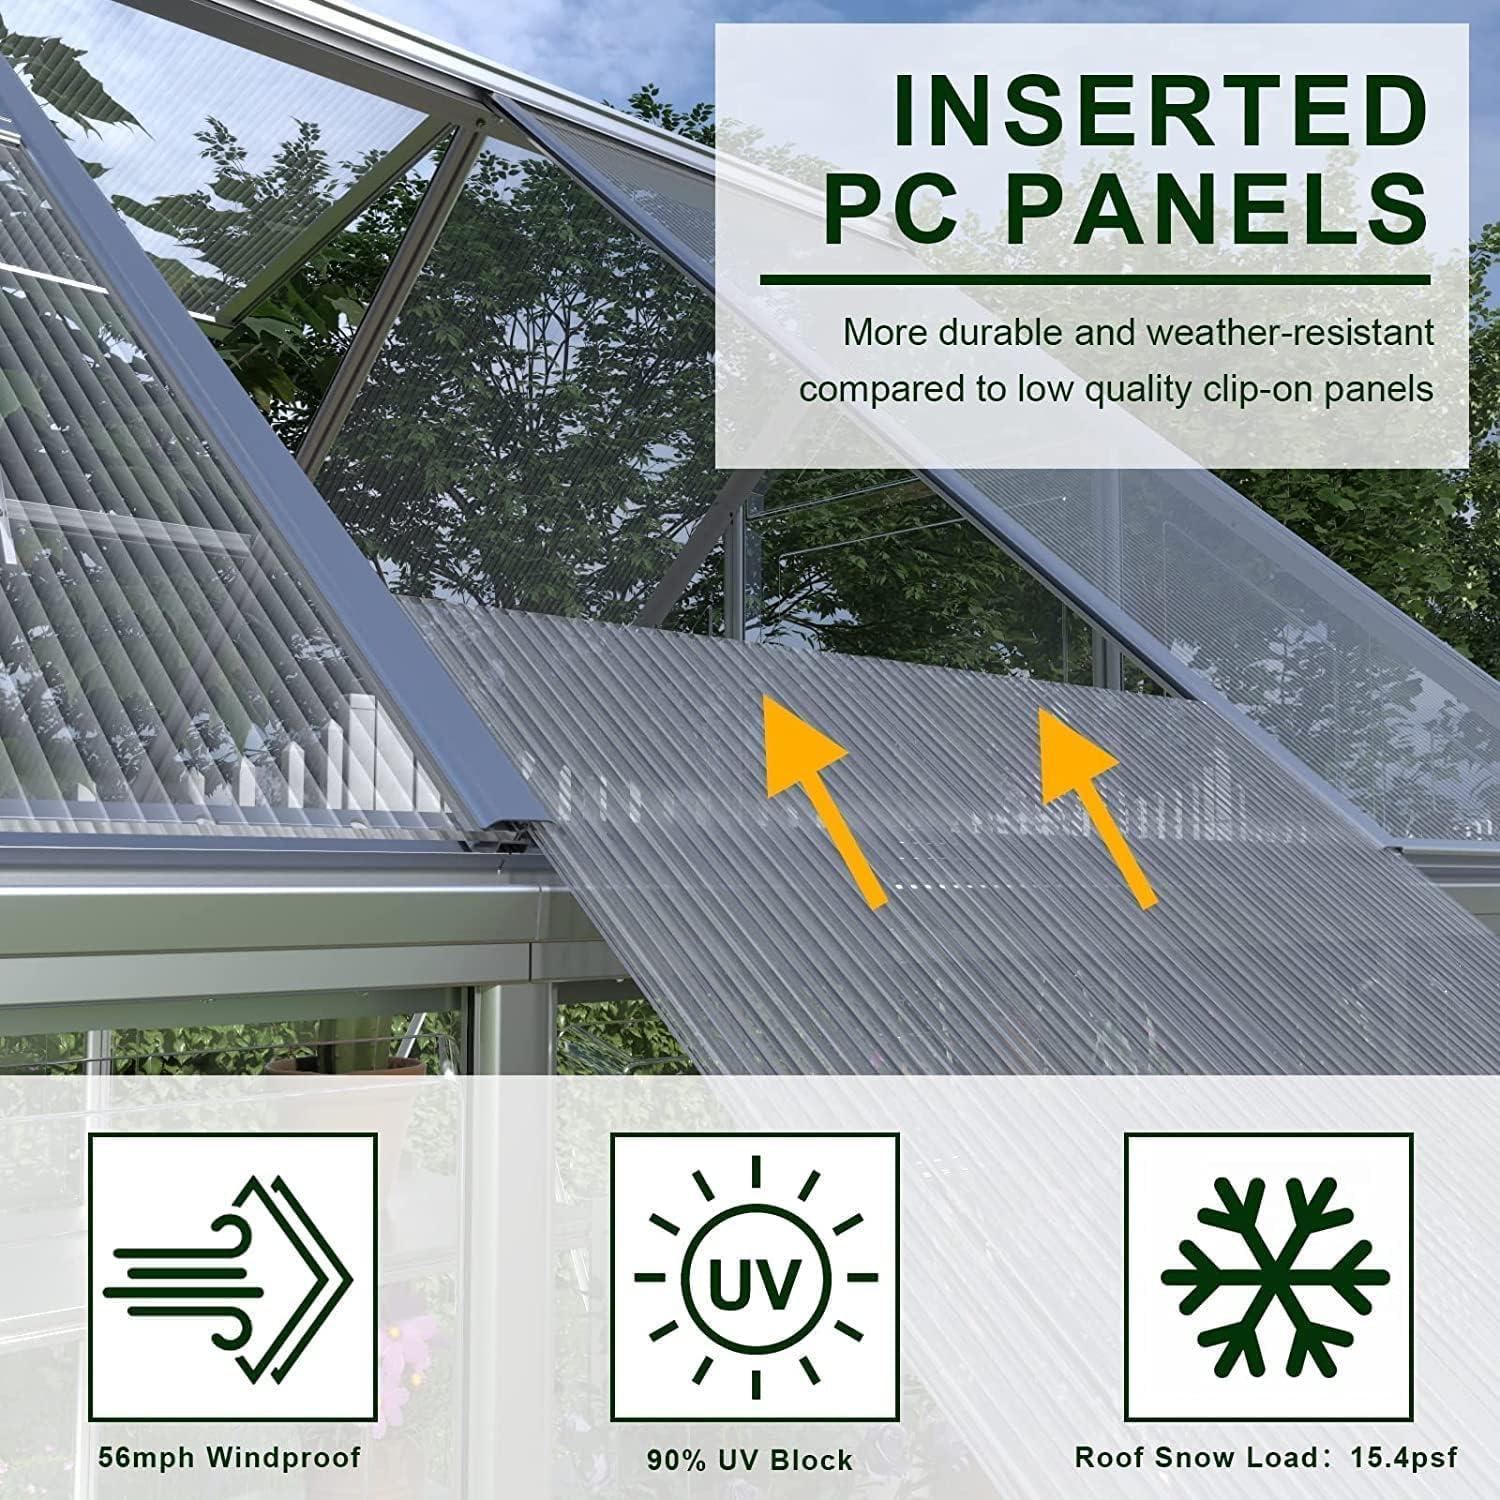
- Hybrid polycarbonate panels: They diffuse light and insulate better than thin plastic, so our seedlings get softer sun and steadier temperatures.
- Secure, lockable hinged door: We found the lock reassuring for tools and seedlings, and the hinged door gives us easy, human-sized access.
- Four adjustable vents: Cross-ventilation is simple to manage; we can dial airflow up or down with changing weather.
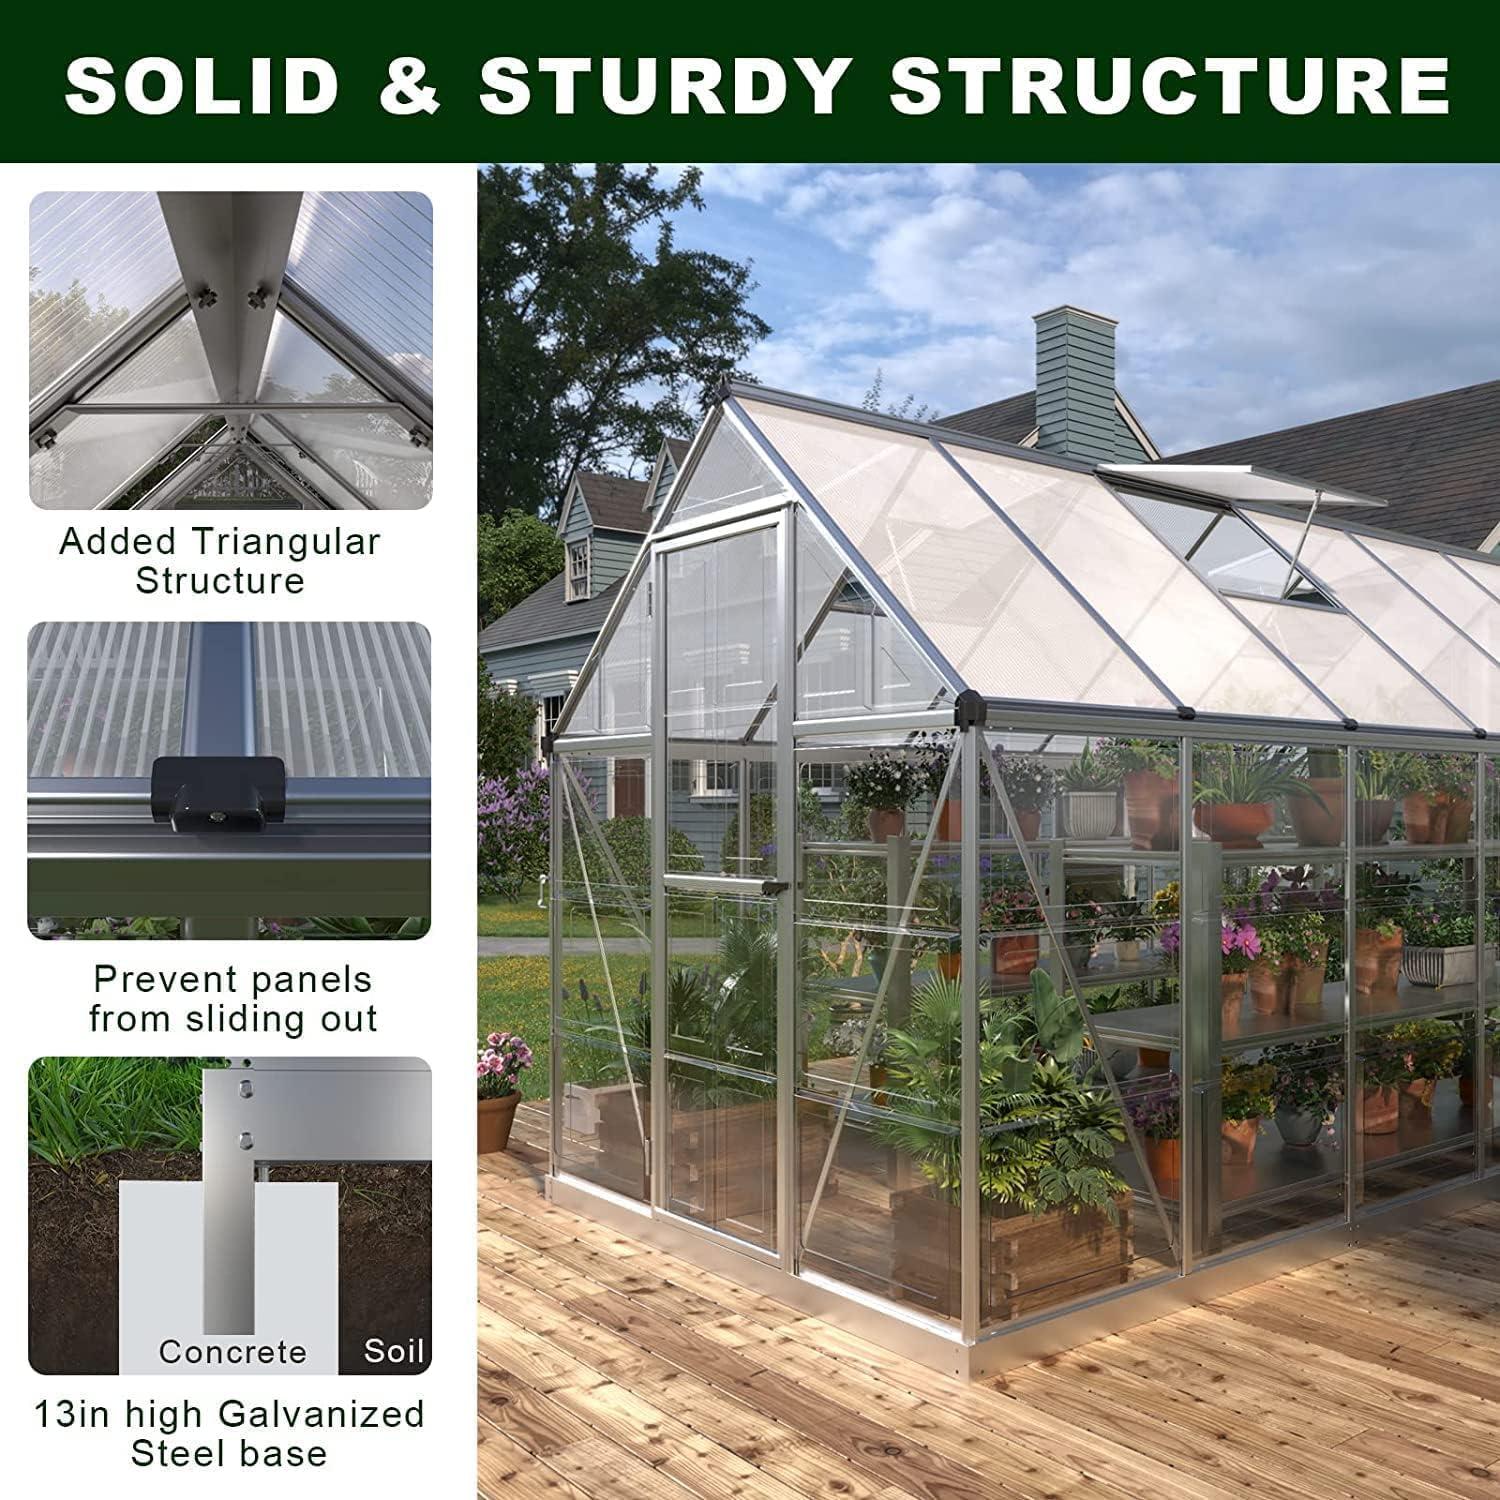
- Aluminum frame: Lightweight and corrosion resistant,the frame makes the structure feel modern and low maintenance.
what to consider
- Assembly demands: The kit has heavy components and sharp edges – we recommend at least two people and protective gear when putting it together.
- Anchoring required: To resist wind and stay level over time, we needed a solid base and proper anchoring; this can add time and cost.
- Heat management in peak sun: Even with vents, we sometiems used shade cloth or fans on hot afternoons to protect tender plants.
- Surface care: Polycarbonate can scratch and show grime; we found occasional gentle cleaning keeps it looking sharp.
- Not replacement for glass aesthetics: If we wanted a full-glass conservatory look, this silver, practical design leans utilitarian rather than ornate.
quick snapshot
| Pros | cons |
|---|---|
| Spacious 6×16 layout | Requires solid anchoring |
| Insulating polycarbonate | Assembly can be heavy-duty |
| lockable hinged door | May need extra cooling in heat |
| 4 vents for airflow | Surface care to avoid scratches |
| Rust-resistant aluminum frame | Less decorative than glass |
Safety note: We always wear gloves and eye protection during assembly, watch for sharp edges and heavy parts, and ensure the greenhouse is properly anchored and ventilated.We keep children and pets away during setup and follow local building codes to keep things safe and sound.
Q&A
Q: What do we mean by “hybrid” polycarbonate, and why does it matter?
A: By “hybrid” we mean the greenhouse pairs rigid polycarbonate panels with an aluminum frame – the strengths of both materials.The panels transmit light while offering some insulation, and the aluminum keeps the structure lightweight and corrosion-resistant. For us, that translates to bright, sheltered growing space without the fragility of glass.
Q: How much usable space do we actually get?
A: The footprint is 6 x 16 ft - 96 square feet – and it’s a true walk-in layout. The hinged door and full-height walls give us easy access for benches, raised beds, and moving pots. It’s big enough for serious hobby gardening without dominating a typical backyard.
Q: How secure is the greenhouse?
A: It comes with a lockable door, which deters casual intruders and curious critters. For added security we recommend using a quality padlock or upgrading to a weatherproof deadbolt if local conditions require it.Anchoring the frame to the ground or a solid base is also essential to prevent tipping in wind.
Q: What should we know about assembly?
A: Assembly is a hands-on job. We found that 2-3 people can complete it in roughly 4-8 hours depending on experience and site prep. Important points:
– Always wear gloves and eye protection; there are sharp edges and heavy components.
- Follow the included instructions step-by-step; don’t force parts into place.
– Use a level and a helper for aligning long frame sections.
– Keep children and pets well away during assembly.
Q: What tools and extra parts should we have on hand?
A: Basic hand tools are usually sufficient: screwdrivers, a cordless drill with appropriate bits, tape measure, level, rubber mallet, and a ladder. For anchoring we recommend anchor bolts or ground screws (depending on base), and weather-rated sealant for any gaps. A pair of work gloves and safety glasses are must-haves.
Q: How do we anchor it,and do we need permits?
A: Proper anchoring prevents wind lift and movement. Options include:
– Bolting to a concrete slab with expansion anchors
– Attaching to a compacted paver or timber base
– Using ground anchors or auger-style earth screws for soil
Local building codes vary – at 96 sq ft some jurisdictions require a permit for outdoor structures, others don’t. We always advise contacting the local building department before installation.
Q: How well does it ventilate and how do we manage temperature and humidity?
A: The unit has four vents plus the hinged door for cross-ventilation. That gives us good passive control of heat and humidity during warm days. For more automated control we suggest adding spring-open vent openers or a small exhaust fan. To avoid excessive condensation, keep vents open periodically and avoid overwatering; for high-humidity crops, consider a dehumidifier or additional airflow.
Q: Can it handle winter and heavy snow?
A: Polycarbonate panels shed light well and provide some insulation, but snow load capacity depends on panel thickness and manufacturer specifications. We recommend:
– Clearing heavy snow promptly to avoid excessive load.
– Reinforcing or adding bracing in heavy-snow or high-wind regions.
– Checking with the manufacturer or a structural engineer if you expect extreme weather.
Q: What maintenance do we need to keep it in good shape?
A: Simple routine care keeps it functional:
– Clean panels with mild soap and water; avoid abrasive cleaners.
– Inspect screws, gaskets, and frame connections seasonally and retighten as needed.
– Replace any cracked panels immediately.
– Lubricate hinges and lock mechanisms occasionally.
– Keep gutters and vents clear of debris.
Q: What kind of foundation or floor works best?
A: Many options work: compacted gravel, paving stones, concrete slab, or a timber base.We prefer a slightly elevated timber or paver base with good drainage – it’s easier on roots and pots, and helps keep the interior tidy. If you expect heavy loads (large planters, benching), choose a solid base like concrete.Q: Are there plants that particularly benefit from this greenhouse?
A: Yes – seedlings, tomatoes, peppers, cucumbers, herbs, and tender perennials do very well. The controlled light and temperature extend the growing season.You can also create microclimates for tropical or humidity-loving plants with careful venting.
Q: How safe is it around children and pets when in use?
A: When assembled and anchored properly the structure is stable, but we still treat it like any outdoor structure: keep the door locked when unsupervised, store tools and chemicals out of reach, and never leave children unattended inside. during assembly, keep kids and pets far away.
Q: What should we do if panels or parts arrive damaged or go missing?
A: Inspect all parts right away against the packing list. If anything is damaged or missing,contact the seller or manufacturer promptly – they typically have replacement panels and hardware available. Take photos of damage for claims.
Q: Any final setup tips from our experience?
A: Yes – plan the site carefully for sun exposure and drainage, pre-assemble small subassemblies on a flat surface, and take your time aligning long rails. Use a friend to steady frames during panel installation, and don’t skip the anchoring. Safety gear and patience make the difference between a frustrating afternoon and a greenhouse we enjoy for years.
If there’s a specific concern we haven’t covered – site-specific anchoring, panel replacement part numbers, or winterizing tips for your climate – tell us about your location and needs and we’ll tailor advice to our experience.
Experience the Difference
We’ll leave our final thoughts with the practical and the poetic: this 6×16 hybrid greenhouse gives us real walk-in space and a sense of security when it’s properly assembled and anchored. The hybrid polycarbonate panels, lockable aluminum frame, hinged door and four vents make it feel like a backyard sunroom for seedlings and weekend projects alike – roomy, bright, and straightforward in design.
Safety remains our top priority during setup and use. always wear appropriate safety gear when assembling the greenhouse. Be aware of sharp edges and heavy components. Ensure the greenhouse is properly anchored and ventilated to prevent damage or injury. Follow all local building codes and regulations for outdoor structures.Keep pets and children away from the greenhouse during assembly and while it is in use.
If you’d like to explore it further or check current availability, take a closer look here: View the 6×16 Hybrid Polycarbonate Greenhouse on Amazon.
Reviews
There are no reviews yet.